Quantcast
Channel: PITSS US – Oracle Forms Upgrade, Forms to ADF, Forms to APEX, Migration
Viewing all 152 articles
Browse latest View live

Oracle Database 11gR2 Setup Prerequisites for Solaris

$
0
0

Oracle Database 11gR2 Setup Prerequisites for Solaris

1.     Minimum System Requirements

1.1.    Oracle Supported DB Platforms (x86_64):

1.1.1. Solaris 10 Update 6+

1.1.2. Solaris 11 (Oracle Database 11.2.0.3 only)

1.2.    Oracle Support DB Platforms (SPARC):

1.2.1. Solaris 10 Update 6+

1.2.2. Solaris 11 (Oracle Database 11.2.0.3 only)

1.3.    *RAM: 2 GB+ (8 GB+ for production environments)

1.4.    Virtual Memory: 4 GB+ (16 GB+ for production environments)

1.5.    HDD Partitioning:

*Software Mount: One file system mount with at least 10 GB of free space to store the software and temporary file storage for servers. This value could be significantly higher (hundreds of GB if not TB) depending on the size of the data.

TEMPFS Space: 4GB+ (Minimum: 1GB+)

*SWAP: 2-16 GB (equal to amount of RAM if between 2-16 GB RAM; 16 GB if more than 16 GB of RAM)

1.6.    OS User Access Requirements:

1.6.1. OS User will need to own the software mount.

1.6.2. Root user access must be accessible for the installation.

*RAM and File System Mount Specifications: For production systems, please consult PITSS or Oracle on sizing recommendations. The amount of RAM, HDD Space for SWAP and Software Mounts will vary depending on end-user usage and application characteristics such as the expected size of the data tablespaces you plan to use.

2.     Other Solaris OS Requirements

2.1.    Open File Limits:

“soft nproc” should be at least 2047
“hard nproc” should be at least 16384

“soft nofile” should be at least 1024
“hard nofile” should be 65536

“soft stack” should be at least 10240

3.     Required Packages

3.1.    Below is a list of packages/libraries that need to be installed prior to installing Oracle Database 11gR2. Please note the difference between the processor and release types


10u6+ for SPARC and x86_64

11 for SPARC and x86_64

SUNWarc

SUNWlibC

SUNWbtool


SUNWhea


SUNWlibC


SUNWlibm


SUNWlibms


SUNWsprot


SUNWtoo


SUNWi1of


SUNWi1cs (ISO8859-1)


SUNWi15cs (ISO8859-15)


SUNWxwfnt


SUNWcsl


For Solaris 11 (SPARC or x86_64), the following fonts will need to be installed:

  • system/font/daewoo-misc
  • system/font/gnome-fonts
  • system/font/isas-misc
  • system/font/jis-misc
  • system/font/misc-ethiopic
  • system/font/misc-meltho
  • system/font/sun-ja-bitmap
  • system/font/sun-ja-bitmap-unicode
  • system/font/truetype/arphic-ukai
  • system/font/truetype/bh-luxi
  • system/font/truetype/bitstream-vera
  • system/font/truetype/fonts-core
  • system/font/truetype/gentium
  • system/font/truetype/google-droid
  • system/font/truetype/hanyang-ko
  • system/font/truetype/ipafont-mincho
  • system/font/truetype/sil
  • system/font/truetype/unfonts-ko-core
  • system/font/truetype/unfonts-ko-extra
  • system/font/truetype/unifont
  • system/font/truetype/wqy-zenhei
  • system/font/xorg/cyrillic
  • system/font/xorg/iso8859-10
  • system/font/xorg/iso8859-11
  • system/font/xorg/iso8859-13
  • system/font/xorg/iso8859-14
  • system/font/xorg/iso8859-15
  • system/font/xorg/iso8859-16
  • system/font/xorg/iso8859-2
  • system/font/xorg/iso8859-3
  • system/font/xorg/iso8859-4
  • system/font/xorg/iso8859-5
  • system/font/xorg/iso8859-7
  • system/font/xorg/iso8859-8
  • system/font/xorg/iso8859-9


After the fonts are installed, the following environment variables must be set in your profile:


  • Solaris x86_64: export NLS_LANG=AMERICAN_AMERICA.WE8ISO8859P15 or set the DISPLAY variable to any 64-bit Linux machine
  • Solaris SPARC:
    • export LC_ALL=C
    • export NLS_LANG=AMERICAN_AMERICA.WE8ISO8859P15 or set the DISPLAY variable to any 64-bit Linux machine

For more information from Oracle on required package information please go to:

http://docs.oracle.com/cd/E11882_01/install.112/e24351/toc.htm#CHDHFGBJ (x86-64)

http://docs.oracle.com/cd/E11882_01/install.112/e24349/toc.htm#CHDHFGBJ (SPARC)


4.     Software Requirements

4.1.    Oracle Database 11gR2 (11.2.0.1)

4.1.1. Can be downloaded from:

http://www.oracle.com/technetwork/database/enterprise-edition/downloads/index.html


4.1.2. After accepting the license agreement, please download the setup files that correspond to your system OS.

clip_image001


If you have any questions on the above, please contact PITSS.


Oracle Database 11gR2 Setup Prerequisites for IBM AIX on POWER Systems

$
0
0

Oracle Database 11gR2 Setup Prerequisites for IBM AIX on POWER Systems

1.     Minimum System Requirements

1.1.    Oracle Supported DB Platforms:

1.1.1. Version 5.3 UL 9+

1.1.2. Version 6.1 UL2+

1.1.3. Version 7.1 UL0+

1.2.    *RAM: 2 GB+ (8 GB+ for production environments)

1.3.    Virtual Memory: 4 GB+ (16 GB+ for production environments)

1.4.    HDD Partitioning:

*Software Mount: One file system mount with at least 10 GB of free space to store the software and temporary file storage for servers. This value could be significantly higher (hundreds of GB if not TB) depending on the size of the data.

TEMPFS Space: 4GB+ (Minimum: 1GB+)

*SWAP: 2-16 GB (equal to amount of RAM if between 2-16 GB RAM; 16 GB if more than 16 GB of RAM)

1.5.    OS User Access Requirements:

1.5.1. OS User will need to own the software mount.

1.5.2. Root user access must be accessible for the installation.

*RAM and File System Mount Specifications: For production systems, please consult PITSS or Oracle on sizing recommendations. The amount of RAM, HDD Space for SWAP and Software Mounts will vary depending on end-user usage and application characteristics such as the expected size of the data tablespaces you plan to use.

2.     Other Unix OS Requirements

2.1.    Open File Limits:

“soft nproc” should be at least 2047
“hard nproc” should be at least 16384

“soft nofile” should be at least 1024
“hard nofile” should be 65536

“soft stack” should be at least 10240

3.     Required AIX Packages

3.1.    Below is a list of packages/libraries that need to be installed prior to installing Oracle Database 11gR2. Please note the difference between the release types.


AIX 5.3 UL9+

AIX 6.1 UL2+

AIX 7.1 UL0+

bos.adt.base

bos.adt.base

bos.adt.base

bos.adt.lib

bos.adt.lib

bos.adt.lib

bos.adt.libm

bos.adt.libm

bos.adt.libm

bos.perf.libperfstat 5.3.9.0+

bos.perf.libperfstat 6.1.2.1+

bos.perf.libperfstat

bos.perf.perfstat

bos.perf.perfstat

bos.perf.perfstat

bos.perf.proctools

bos.perf.proctools

bos.perf.proctools

xlC.aix50.rte.10.1.0.0+

xlC.aix61.rte.10.1.0.0+

xlC.aix61.rte.10.1.0.0+

gpfs.base 3.2.1.8+

xlC.rte.10.1.0.0+

xlC.rte.10.1.0.0+


gpfs.base 3.2.1.8+

gpfs.base 3.3.0.11+


For more information from Oracle on required package information please go to: http://docs.oracle.com/cd/E11882_01/install.112/e24335/toc.htm#CHDFFBIF


4.     Software Requirements

4.1.    Oracle Database 11gR2 (11.2.0.1)

4.1.1. Can be downloaded from:

http://www.oracle.com/technetwork/database/enterprise-edition/downloads/index.html


4.1.2. After accepting the license agreement, please download the setup files that correspond to your system OS.

clip_image001


If you have any questions on the above, please contact PITSS.

JDeveloper 11.1.2.4 (11gR2) Installation–Read This Before Installing!

$
0
0


The latest release of JDeveloper 11.1.2.4, brought some new issues to address for the installation process. Below is a guide on making your 11.1.2.4 JDeveloper installation a breeze.

  1. Download and Install JDK 1.6.0_39+ or higher. I installed JDK 1.6.0_43.
    Java Download Location: http://www.oracle.com/technetwork/java/javasebusiness/downloads/java-archive-downloads-javase6-419409.html
    Note: Even if you download the JDEveloper installation kit with a bundled JDK, the bundled JDK will not work. This is because Oracle bundled in an unsupported JDK version. Installing the wrong JDK will result in an error message when trying to start up JDeveloper

  2. Download the JDeveloper 11.1.2.4 release that applies to your system. If you do not know which type to get, the “Generic” installer will always work.
    Download location: http://www.oracle.com/technetwork/developer-tools/jdev/downloads/index.html
    Note: Mac OS X users must download the “Generic” Installer.

  3. Start up the JDeveloper 11.1.2.4 Installer
    For those whom downloaded the Windows JDeveloper Installation kit, simply double click on the “jdevstudio11124install.exe” installer.
    For “generic” jar folks: either double click on the jar, or run the command “%JAVA_JDK_HOME%/bin/java -jar name_of_jar_file.jar” in your command-line utility.
    Note: %JAVA_JDK_HOME% should be replaced with actual file system installation path of your JDK 6. and

  4. Choose your Middleware Home Directory. Make sure the directory you chose is clean/empty. For instance, I have multiple JDevelopers installed. Thus i have a separate middleware home for each JDeveloper install – to keep each environment clean.

  5. At the “Choose Install Type” screen, select “Custom“.

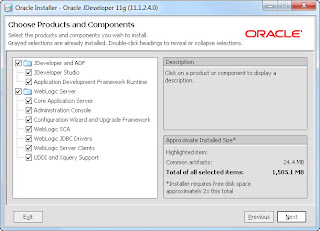
  6. At the “Products and Components” screen, leave all options checked unless you have a preference otherwise.

  7. The following steps are very important, please follow carefully!
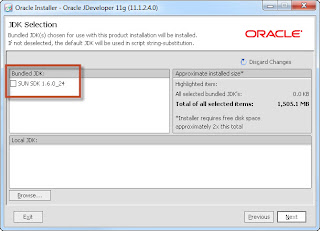
  8. At the “JDK Selection” screen, uncheck the SUN JDK 1.6.0_24. (Its not supported to run JDeveloper 11.1.2.4!)

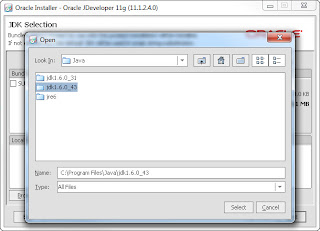
  9. In the “JDK Selection” screen, click “Browse” to locate the JAVA_HOME of your JDK 1.6.0_39+. Click “Select” on the JDK Home.

  10. After selecting your JDK Home, your JDK should show up under “Local JDK”, as shown below. You can now proceed to the next screen!

  11. Confirm your “Product Installation Directories”. and click through the rest of the installer and you have a vanilla installation!


Important For ADF Mobile Developers:

  1. Use the JDeveloper “Help > Check for Updates” utility to download the ADF Mobile Bundle – its quick and easy to do.
  2. If you are developer native OS apps for Android devices, you need to go into your Android SDK Manager, and download the “Google Cloud Messaging for Android Library“, as shown below.

    If you do not download this SDK component, you’ll be greeted with deployment errors in JDeveloper:
    Failed to locate the Google Cloud Messaging for Android Library file named “gcm.jar”. (oracle.adfmf.framework.dt.deploy.android.deployers.ValidatePreferencesDeployer)


If you have any questions, please contact PITSS.

JDeveloper/ADF Mobile and Android SDK (Rev 22) Incompatibility

$
0
0


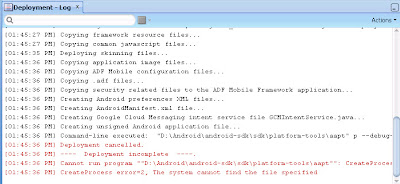
You might run into an ADF Mobile deployment error below:

Cannot run program “… platform-tools\aapt”

CreateProcess error=2, The system cannot find the file specified.

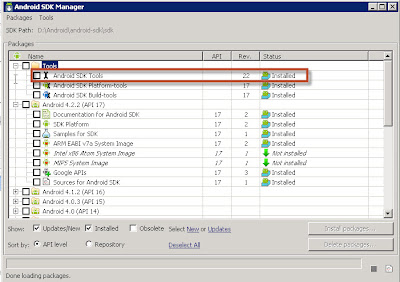
The cause of the error was that the “Android SDK Tools” was updated from Rev. 21.1 to Rev 22. 


The reason Rev. 22 causes the error is more on the side of JDeveloper. It moved appt.exe to a different directory, however you can’t configure JDeveloper where to find this executable.

To fix the issue, take your SDK version back to Rev. 21.1, by extracting the Rev 21.1 zip. You will have to re-install the Android APIs, but it shouldn’t take long to get re-setup.

Until Oracle changes how JDeveloper can find the binary, you can use this workaround!

JDeveloper/ADF Mobile – Android SDK Location Issue

$
0
0

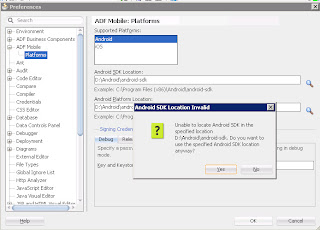
There is a potentially confusing configuration setting in JDeveloper, when selecting “Android SDK Location” under “Preferences > ADF Mobile > Platforms > Android”. JDeveloper suggests to select a path like “%Root_Path%/Android/android-sdk”. However, if you select the path as suggested (with the latest version of Android), you will be greeted with the following warning message in JDeveloper: “Unable to locate Android SDK in the specified location %some_path%. Do you want to use the specified Android SDK location anyway?”

This is because the later versions of Android SDK (ADT bundle) moved the SDK Home to the location “Android/android-sdk/sdk” directory. Instead of “Android/android-sdk“, as shown below.

Selecting the proper SDK location, lets you continue error free.

PITSS.CON Error –‘Cannot Write PLL’ When Updating Libraries to File System

$
0
0

You are making updates to libraries (PLLs) inside the PITSS.CON database repository. When you go to update the library in Module Handling to save the changes back to the file system, the library inside the C:\pitsscon\users\pitss#\olb directory should be updated where the original copy of the library is moved to the C:\pitsscon\users\pitss#\old directory. However, there is a known issue where the following error may appear instead when trying to update a PLL back to the file system:

image

At the bottom of the Module Handling window, you may see the error “Updating of modules completed with errors.”

NOTE: In PITSS.CON 12.1.3, you may see instead a glitch where the update says it completes, but the library is not actually updated:

image

In this case, the “Fmb Old Path” in the INIT_PARAMETER table for the PITSS.CON user is set incorrectly. It should be set to the user’s old directory. The screenshot below shows it set incorrectly:

image

To change the path, double-click in the text box next to Path Name. A dialog window will appear. Make sure you are in your PITSS.CON user folder. Next, select the “old” directory and click “Open”.

SNAGHTMLd0d57b

The path name will now be the correct directory. Click on another path location to save the changes.

image

Return to Module Handling. You should be able to successfully update the libraries back to the file system:

image

FRM-93618: Fatal error reading data from runtime process

$
0
0

Oracle HTTP Server (OHS) can be used as a load balancer between two Oracle Forms and Reports environments. One of our customers had run into a error when using JRE 7 when logging into the Oracle Forms application. They were receiving the following error:

“FRM-93618: fatal error reading data from runtime process

Contact your system administrator.”

FRM-93618

The production environment had the following multi-server architecture (NOTE: The error may occur if not using OAM as no errors were detected in the OAM or OID side):

Front-end Server (Point of entry for end-users):

  1. Oracle HTTP Server (11.1.2.1) (load balancing occurs here using forms.conf and mod_wl_ohs.conf) – Using SSL

Two Middle-Tier Servers

  1. Oracle Forms and Reports 11.1.2.1
  2. Oracle WebLogic Server 10.3.6

Back-end Infrastructure Server

  1. Oracle Internet Directory 11.1.1.5.0
  2. Oracle Access Manager 11.1.1.5.0
  3. Oracle WebLogic Server 10.3.5

The scenario was that the OHS and Forms/Reports environments were upgraded from 11.1.2.0 to 11.1.2.1 in order to support the use of Java 7 (JRE 7) for end users. End-users would log into the front-end and would log into OAM (using single sign-on). After the user is authenticated in OAM, the user would be directed (by a round-robin approach) to one of the two middle-tier servers where the Oracle Forms application is. However, if the user used JRE 6, they could access Forms without a problem. If the user used JRE 7, the FRM-93618 error appeared instead, preventing the user from continuing. Whenever a direct connection to the middle-tier server was performed (again using OAM to authenticate), no errors would occur regardless of the JRE used.

SOLUTION:

The load balancing in OHS for Oracle Forms is performed using forms.conf (located in %ORACLE_INSTANCE%\config\OHS\ohs1\moduleconf). A parameter called “CookieTracking” needs to be set to “On” within the <Location /forms> tags. In order to apply this, you will need to do the following steps:

  1. Make a backup of forms.conf in the load balancing server
  2. Open up forms.conf in a text editor
  3. Locate <Location /forms>. In between this tag and the </Location> tag, add the following parameter: CookieTracking On
  4. Save and close the file
  5. Restart OHS (the load balancing server)

After applying the above changes, FRM-93618 will no longer appear when using JRE 7. This will work using the Internet Explorer, Firefox, and Chrome browsers.

Running a Report from URL in Forms & Reports 11.1.2.1.0 Results in REP-51002

$
0
0

There is a bug in Forms and Reports 11.1.2.1.0 (11gR2) which no reports can be run directly from the URL when using the standalone reports server. The bug occurs when no userid is specified in the URL.

Reproducing the Error:

1. Run a report from URL using the standalone reports server (Example: http://server.domain:9002/reports/rwservlet?server=name_of_standalone_reports_server&report=name_of_report&desformat=pdf&destype=cache

image

2. After logging in with the database credentials, the REP-51002 error (REP-51002: Bind to Reports Server name_of_standalone_reports_server failed) appears:

image


Solution:

IMPORTANT: Before applying any Oracle patches, it is recommended to review the README file which comes with the Oracle patch as well as to make a backup of your Middleware environment.

  1. Download Patch 16426793 from My Oracle Support.
  2. Extract the zip file in the machine where the problem is occurring.
  3. Shutdown all WebLogic servers and instances in the affected domain.
  4. Open up Command Prompt as an administrator (or open a terminal session if using Linux/Unix)
  5. Set the following environment variables:
    1. Windows:
      1. set ORACLE_HOME=C:\Oracle\Middleware\as_1 (can also be Oracle_FRHome1 or something equivalent)
      2. set PATH=%PATH%;C:\Oracle\Middleware\oracle_common\OPatch
    2. Linux/Unix:
      1. export ORACLE_HOME=$MW_HOME/as_1 (can also be Oracle_FRHome1 or something equivalent) (Replace $MW_HOME with the path to your Middleware home)
      2. export PATH=$PATH:$MW_HOME/oracle_common/OPatch
  6. Go to the directory where you extracted the zip file and go into the 16426793 in Command Prompt or your terminal window.
  7. Run: opatch apply
  8. Press ‘y’ when it asks if the system is ready for patching.
  9. When complete, start up your WebLogic servers and instances.

After completing the steps above, the report should run without a problem after logging into the login screen shown in step 1 in the “Reproducing the Error” section using the same URL.

Source: Oracle Support Note 1454773.1


PDF Reports Not Displayed Correctly in Forms/Reports 11.1.2.1.0

$
0
0

There is a bug in Forms/Reports 11.1.2.1.0 where reports generated into PDFs are not displayed correctly in Windows, AIX, and Solaris environments. According to Oracle Support note 1522543.1, an Oracle Patch 16046595 will need to be applied to the Forms/Reports environment.

How to Apply the Patch:

  1. Download Patch 16046595 from My Oracle Support
  2. Extract the patch into your directory. As a reference, let’s call the extracted location PATCH_TOP.
  3. Shut down all WebLogic servers and instances (OPMN).
  4. Set the following environment variables (NOTE: MW_HOME is your Oracle Middleware home):
    1. Windows: set PATH=%PATH%;%MW_HOME%\oracle_common\OPatch
    2. Windows: set ORACLE_HOME=%MW_HOME%\Oracle_FRHome1
    3. Unix: export PATH=$PATH:$MW_HOME/oracle_common/OPatch
    4. Unix: export ORACLE_HOME=$MW_HOME/Oracle_FRHome1
  5. Go to the PATCH_TOP/16046595 directory (PATCH_TOP\16046595 in Windows)
  6. Run: opatch apply
  7. Type ‘y’ and press Enter when it asks if the system is ready for patching.
  8. When the patch is finished, start up the WebLogic servers and OPMN.

PDF reports should display correct after applying the steps above.

NOTE: Please review the README file before applying any Oracle patch!

Source: Oracle Support note 1522543.1

PITSS.CON Error – Database Link is Invalid (When Moving a PITSS.CON License)

$
0
0

When moving your PITSS.CON license from the old database to the new database, make sure that both databases are able to communicate with each other. If this is not the case, the following error will appear before the PITSS.CON move begins:

Database link is invalid! Please verify the tnsnames.ora of the new database to contain the alias %OLD_DB_SERVICE_NAME% to the old database. ORA-12154: TNS:could not resolve the connect identifier specified

image

Receiving this error will prohibit you from continuing the PITSS.CON move.

To fix this problem, make sure that tnsnames.ora contains the entries for both the old database (where PITSS.CON is currently) and the new database (to where you plan to move PITSS.CON). The tnsnames.ora file should be present in the following locations:

  • On the database server where the new database is located
  • On the database server where the old database is located
  • On the PC/server with Forms and Reports 11g/11gR2 where you are installing PITSS.CON

Make sure that the tnsping and sqlplus tests work in those environments. When all the tests are passed, restart the PITSS.CON installer and try the PITSS.CON move again. The error should not appear this time.

Unable to Check In/Out Files To/From the Client in PITSS.CON Source Control

$
0
0

When you are using PITSS.CON Source Control, you have the option of checking in or checking out files to/from either the application server or the client machine. There is a known issue where you may run into errors when trying to check in or out files to/from the client. Examples are shown below:

Check Out Files to Client:

run_task.check_out_file error (1): ORA-06544: PL/SQL: internal error, arguments: [77604], [], [], [], [], [], [], [] ORA-06553: PLS-801: internal error [77604]

image

Check In Files to Client (New Files):

run_task.add_file error (2): file cannot be loaded ORA-06544: PL/SQL: internal error, arguments: [77604], [], [], [], [], [], [], [] ORA-06553: PLS-801: internal error [77604]

image


Solution

PITSS.CON relies heavily on the WebUtil library to allow the client to interact with the server. Depending on how the public synonym for the WebUtil DB package “webutil_db” was created, it needs to be created within the WebUtil schema itself. To solve this problem, you will need to perform the following steps in the database where the WebUtil schema is located (NOTE: DBA access is required):

Conditional steps:

  1. If a public synonym webutil_db is created, run the following as the DBA user: drop public synonym webutil_db;
  2. Make sure everybody is out of PITSS.CON and any forms application which uses WebUtil

Steps:

  1. Run the following SQL statement: grant public synonym to webutil; (NOTE: If another user has the WebUtil package, grant public synonym to that user instead)
  2. Log into the database (i.e. sqlplus) as the webutil user (or the user who has the webutil_db package)
  3. Run the following SQL statement: create public synonym webutil_db for webutil_db;
  4. Log out of the user and log in as a DBA user
  5. Run the following SQL statement: grant execute on webutil_db to public;
  6. Compile the webutil.pll library using the webutil user

After applying the steps above, you should be able to check in and check out files to/from the client.

PITSS.CON Error – The Maximum Number of Workstations is Reached

$
0
0

Every PITSS.CON license contains a number of users which can be installed. Depending on the number of PITSS.CON users purchased in your license, the number of license PITSS.CON users is equivalent to the number of PC workstations which can be assigned to PITSS.CON. A list of all registered workstations can be found in the Workstations Administration module in the MIG Administrator user.

‘X’ PITSS.CON Users = Max of ‘X’ Registered Workstations

Example: If you have purchased 5 PITSS.CON users, up to 5 workstations can be registered into PITSS.CON which can use the application.

When a user logs into PITSS.CON from a PC whose workstation is NOT in Workstations Administration, the PC will be registered into the Workstations Administration module. However, if the number of workstations registered matches the number of licensed PITSS.CON users, anyone who tries to connect into PITSS.CON from another workstation will receive the following error:

The maximum number of workstations is reached! Please contact your PITSS.CON administrator.

image

Fortunately, you are able to remove workstations from the Workstations Administration module in the MIG user. You may accomplish this with the following steps:

  1. Log into PITSS.CON with the MIG user
  2. Go to Workstations Administration
    1. image
  3. You will see a list of the registered workstations. You will need to remove a workstation before a new one can be registered. To remove a workstation, click on a workstation other than the one you are currently logged in with and press the “Remove Workstation” button.
    1. image
  4. The workstation will now be removed. Feel free to remove any workstations you need to.

After applying the steps above, the new PC should be able to log into PITSS.CON without seeing the error.

How to Fix “Missing Permissions manifest” and “Missing Codebase manifest” Warnings in Oracle Forms using JRE 1.7.0_25 or higher

$
0
0

To protect end-users from the latest security threats, Oracle has improved security in Java. Starting with Java Runtime 7 Update 25, you may have noticed the following warnings in the Java Console for jar files such as frmall.jar or any custom-made jar files:

  • Missing Permissions manifest attribute for: http://server.domain:port/forms/java/name_of_jar.jar
  • Missing Codebase manifest attribute for: http://server.domain:port/forms/java/name_of_jar.jar

image

At this time (with using the latest JRE available), these warnings will not cause any problems running any Oracle Forms application. These warnings appear due to how the Forms application jar files are set up. By default, the jar files deployed by every Oracle Forms application such as frmall.jar will present these warnings.

How to Remove the warnings for the Oracle Forms jar files such as frmall.jar, etc.

Oracle Patch 16837591 is able to correct this problem as it will apply the necessary updates to the Oracle Forms jar files supplied by Oracle to prevent this warning from appearing. This patch can be downloaded from My Oracle Support. The patch is available for any Oracle-supported operating system.

Once the patch is downloaded and extracted, you may install it by completing these steps:

  1. Shut down all WebLogic servers and instances running in the Forms domain.
  2. Open up Command Prompt (if using Windows) or an SSH client (if using Unix) and change the directory to the directory where you extracted the patch.
  3. cd 16837591
  4. Set the ORACLE_HOME and PATH environment variables similar to how it is done below (NOTE: The actual values of ORACLE_HOME and PATH may differ depending on how your environment is set up):
    1. Windows
      1. set ORACLE_HOME=C:\Oracle\Middleware\Oracle_FRHome1
      2. set PATH=%PATH%;C:\Oracle\Middleware\oracle_common\OPatch
    2. Unix
      1. export ORACLE_HOME=/oracle/middleware/Oracle_FRHome1
      2. export PATH=$PATH:/oracle/middleware/oracle_common/OPatchimage
  5. Run: opatch version (to make sure you are using an OPatch version level that is supported by the README file which comes with the patch).
    1. image
  6. Run: opatch apply
    1. image
  7. When it asks if the system is ready for patching, type: y
    1. image
  8. Once complete, you may start up the WebLogic servers and OPMN instances in the Oracle home.

              image

After completing the steps above, the warnings should no longer appear for any of the Oracle-supplied jar files:

image

NOTE: All end-users will be re-presented with this warning. As the frmall.jar file is from Oracle, you may run this and click the option to trust the publisher.

image

NOTE: This patch will NOT fix any other jar files that were custom made or ones made by a third party such as jacob.jar. To fix these jar files, refer to http://docs.oracle.com/javase/7/docs/technotes/guides/jweb/no_redeploy.html for more information. (Modified October 24, 2013) –> We have also created a knowledge base article specifying how you may update custom jar files with these parameters: http://pitss.com/us/2013/10/24/how-to-modify-custom-jar-files-with-permissions-and-codebase-attributes/

NOTE: Be sure to review the README file included with an Oracle patch before applying it. PITSS will not be held responsible for anything that happens when running any Oracle patch. Also, never make any changes or updates to any Oracle-supplied jar files (jar files which start with “frm”) without consent by Oracle (outside of this patch). Failure to do so may require a reinstallation of Oracle Forms and Reports.

NOTE: This Oracle patch is only supported with Forms 11.1.1.7.0 and 11.1.2.1.0. If you are using an older Forms version, it is recommended to upgrade to one of these two versions before applying this patch.

Source: Oracle Support note 1563023.1.

Unable to Open PITSS.CON Editor When Using Java Runtime 7 Update 21 or Higher

$
0
0

Beginning with Java Runtime 7 update 21, Oracle Forms added additional security to Java to protect all end-users from the latest security vulnerabilities. However, with these updated security patches, if you use PITSS.CON with JRE 7u21 or higher, any time you attempt to use the PITSS.CON Editor to view or edit code, you will see that nothing happens (no errors are seen in PITSS.CON).

image

However, if you go into the Java console, you will notice numerous Java exceptions such as:

java.lang.NullPointerException
    at pitssEditor.PitssBean.formLoadedUpdate(PitssBean.java:513)
    at pitssEditor.PitssWrapper.setProperty(PitssWrapper.java:173)
    at oracle.forms.handler.ComponentItem.setCustomProperty(Unknown Source)…

To resolve the problem, we have made updates to five of our jar files which are used for this feature in PITSS.CON, so that they are compliable with the Java security patches. Please contact PITSS at support@pitssamerica.com for these jar files when you need to fix this issue.

Once you have received the jar files, please follow these steps to solve the problem:

  1. Go to C:\pitsscon\PitssJava (NOTE: Your PITSS.CON directory may be in another hard disk if not in the C drive)
  2. Make a backup of the following jar files:
    1. pitssCFS.jar
    2. pitssE.jar
    3. pitssFS.jar
    4. pitssH.jar
    5. pitssLE.jar
  3. Copy the jar files you have downloaded from PITSS into this directory. The jar files already in C:\pitsscon\PitssJava will be replaced with the updated jar files.
    1. image
  4. Restart WLS_FORMS.

After you have applied the fix above, launch PITSS.CON, and you should be able to use the PITSS.CON Editor again.

image

How to Switch From JRockit to JDK in WebLogic

$
0
0

If you have configured Oracle WebLogic Server (whether as a standalone product or as a part of Oracle Fusion Middleware) to use JRockit, you can use these steps to configure your WebLogic environment to switch from Oracle JRockit to Oracle JDK (formerly Sun JDK).

NOTE: Please make a backup of all configuration files that will be updated.

NOTE: The Oracle Middleware home will represented by the environment variable %MW_HOME% in this article. Also, we will use JDK 1.6.0_45 (64-bit) installed in C:\Program Files\Java\jdk1.6.0_45 as an example.

  1. Edit the file %MW_HOME%\wlserver_10.3\common\bin\commEnv.cmd
    1. Look for “set  JAVA_HOME=…” and change the path so that it reads “set  JAVA_HOME=C:\Program Files\Java\jdk1.6.0_45” (or in whichever directory your JDK is installed)
    2. image
  2. Edit the file %MW_HOME%\user_projects\domains\%DOMAIN%\bin\setDomainEnv.cmd for each of your WebLogic domains (which you wish to move from JRockit to JDK)
    1. Look for “set BEA_JAVA_HOME=…”. Unset this variable so that it reads “set BEA_JAVA_HOME=”.
    2. Look for “set SUN_JAVA_HOME=” right below it and change the path so that it reads “set SUN_JAVA_HOME=C:\Program Files\Java\jdk1.6.0_45” (or in whichever directory your JDK is installed)
    3. Not far below, look for “set JAVA_VENDOR=Oracle”. Change this to “set JAVA_VENDOR=Sun”.
    4. Look for “set JAVA_HOME=…” right below it and change the path so that it reads “set JAVA_HOME=C:\Program Files\Java\jdk1.6.0_45” (or in whichever directory your JDK is installed)
    5. image
  3. Edit the file %MW_HOME%\wlserver_10.3\common\nodemanager\nodemanager.properties
    1. Look for any set parameters called “JavaHome” and change the parameter’s value to “JavaHome=C\:\\PROGRA~1\\Java\\JDK16~1.0_4\\jre”
    2. image
  4. Edit the file %MW_HOME%\utils\bsu\bsu.cmd
    1. Look for the line “set JAVA_HOME=…” and change the path so that it reads “set JAVA_HOME=C:\Program Files\Java\jdk1.6.0_45” (or in whichever directory your JDK is installed).
  5. Edit the file %MW_HOME%\utils\quickstart\quickstart.cmd
    1. Look for the line “set JAVA_HOME=…” and change the path so that it reads “set JAVA_HOME=C:\Program Files\Java\jdk1.6.0_45” (or in whichever directory your JDK is installed).
  6. Edit the file %MW_HOME%\utils\uninstall\uninstall.cmd
    1. Look for the line “set JAVA_HOME=…” and change the path so that it reads “set JAVA_HOME=C:\Program Files\Java\jdk1.6.0_45” (or in whichever directory your JDK is installed).
  7. Restart all WebLogic servers.

Your WebLogic servers should now be using the JDK instead of JRockit.

Source: Oracle Support note 1309855.1


Unable to Run PITSS.CON with Java Runtime 7 Update 45

$
0
0

As of October 16, 2013, Oracle has released the newest Java 7 update – Java 7 Update 45 (7u45 or 1.7.0_45). For the most part, there is not much of a difference between this update and 7u40 (the most recent Java 7 update until today) when it comes to running non-PITSS.CON related Forms applications.

However, when we try to run PITSS.CON using JRE 7u45, we get two Java security warnings similar to the ones you get when using JRE 7u40 with only minor differences:

clip_image001


However, after clicking “Run” in both Java security warnings, PITSS.CON remains at a gray screen indefinitely. When we go to the Java console, we receive Java-related errors due to unsigned jar files:

clip_image002


In conclusion, PITSS.CON will not run at all with the latest Java runtime 7u45. The Internet browser will remain at a gray screen indefinitely:


clip_image004


With the latest Java release, additional security measures have been taken with older Java releases. All Java updates before 7u45 are presented with the following message when they are used with PITSS.CON (or other Forms applications which uses Java during runtime):

clip_image005

This message will appear for all Java 7 Runtime updates prior to 7u45. Clicking “Update (recommended)” will update you to Java 7u45 where clicking “Later” will keep you at the same Java Runtime level you are currently using.

Oracle has made the current Java 7 update the recommended update to have. Due to this, they have added extra security settings to older Java 7 runtimes. Due to this, we have experimented with the following Java 7 runtimes with PITSS.CON and have made the following conclusions from our analysis:

Java 7 Update 21 and older

No problems occur. Everything runs fine in PITSS.CON (the PITSS.CON Editor comes up) regardless of the security settings in the Java Control Panel. NOTE: If you are using Java 7 Update 21 and the PITSS.CON Editor does not work, please see our knowledge base article http://pitss.com/us/2013/10/09/unable-to-open-pitss-con-editor-when-using-java-runtime-7-update-21-or-higher/ which addresses this issue.

Java 7 Update 25

With the default Java console settings, PITSS.CON does not come up at all after receiving many blocked Java application errors such as:

clip_image006

clip_image007

In the Java console (see screenshot below for an example), if we change the Security settings from High (recommended) to Medium, PITSS.CON comes up like normal, but we get a new message (see screenshot below the Java Control Panel screenshot):

clip_image008

clip_image009


Fortunately with JRE 7u25, we’re also given an option to have the warning above to not appear again. However, changing the security settings from High to medium is not recommended as it could present possible security risks if an end-user runs anything with Java outside of PITSS.CON or his/her Forms application.

Java 7 Update 40

We receive the same warnings as we do with Java 7 update 25. We also get the following message:

clip_image010

However, PITSS.CON is able to be used. The only difference is that the PITSS.CON Editor does not work.

When we change the Java Control Panel security settings from High to Medium, we get the original Java security warnings along with this new message:

clip_image011


The end result is that this is similar to using the Medium security settings in the Java console as what is done with Java 7 update 25. When we click the check box and click “Run”, PITSS.CON runs perfectly, including the PITSS.CON Editor. The only difference is that the warning message will always appear and you do not have the option to not have it appear again.

Java 7 Update 45

As mentioned at the top of the page, PITSS.CON does not work at all regardless of the Java Control Panel security settings.

Resolution

For PCs that are running PITSS.CON, it is advised to use Java Runtime 7 Update 21 or earlier at this time (or Java Runtime 7 Update 25 or 40 with using the Medium Java Control Panel security settings (must be sent in each client PC launching PITSS.CON)). PITSS is currently looking into this as we speak, and we will update this press release with more information when the issue has been resolved as well as how you can contact PITSS to receive the fix once it is released.

If you are using Java 7 Update 21 or earlier (or with 7u25 and 7u40 if you are using the Medium security setting in the Java console), you will be prompted to update Java every time you launch PITSS.CON. In this message, click “Later” to remain at the current level. Also, you can also click “Do not ask again until the next update is available” to not see this message again until Oracle releases the next Java 7 update.

clip_image012

How to Implement COS Naming Service for Reports Client-Server Interaction using OPMN

$
0
0

For Oracle Reports client-server interaction in 11g, this interaction can be performed in 1 or 2 ways:

  • Multicasting (Configured by default)
  • Naming Service

If you either wish to use a naming service instead of multicasting, or if you are using the default settings and you receive REP-51002 errors 100% of the time when running anything on rwservlet either with the in-process reports server or the standalone reports server, the following steps will show how you can set up a naming service to form a bridge between the Reports client and the Reports server. Also, this guide will explain how you can have the naming service run as an OPMN service (in Windows, this process will start up automatically).

Setup

  1. If your WLS_REPORTS WebLogic server and standalone report server(s) are running, please shut them down.
  2. Go to %ORACLE_INSTANCE%\config\OPMN\opmn and open up opmn.xml in a text editor (make a backup of this file first).
  3. Create a new <ias-component> after the ones for “dejvm” and “forms”:
    1. <ias-component id=”namingservice”>
        <process-type id=”namingservice” module-id=”CUSTOM”>
          <environment>
           <variable id=”PATH” value=”%ORACLE_HOME%\jdk\bin”/>
          </environment>
          <process-set id=”namingservice” numprocs=”1″>
           <module-data>
            <category id=”start-parameters”>
             <data id=”start-executable” value=”%ORACLE_HOME%\jdk\bin\orbd”/>
             <data id=”start-args” value=”-port 1050 –ORBInitialPort %port%”/>
            </category>
           </module-data>
          </process-set>
        </process-type>
      </ias-component>

      where %ORACLE_HOME% is the full path of your Forms Oracle Home and %port% is the port number you wish to use for your naming service.

      IMPORTANT: Make sure that the port number %port% is not being used. Examples of port numbers we have used include 14021 or 14022.

      image

    1. Further down in opmn.xml, look for <ias-component id=”RptSvr_%COMPUTERNAME%_asinst_1”> or something similar. After the </module-data> tag, add the following dependency (this allows OPMN to start the naming service before the standalone reports server):
      1. <dependencies>
                <managed-process ias-component=”namingservice” process-type=”namingservice” process-set=”namingservice” autostart=”true”/>
            </dependencies>

        image

    2. Save and close the file.
    3. Open up Command Prompt and navigate to %ORACLE_INSTANCE%\bin.
    4. If OPMN is not running, run “opmnctl start”. Otherwise, run “opmnctl reload”.
    5. Start the naming service with the following command: “opmnctl startproc ias-component=namingservice”
    6. If successful, you should see that the process is “Alive” when you run “opmnctl status”.
    7. Go to %ORACLE_INSTANCE%\config\ReportsServerComponent\RptSvr_%COMPUTERNAME%_asinst_1 and open rwnetwork.conf in a text editor (make a backup of this file first)
    8. Comment out the line <multicast channel…> and add a new line below:
      1. <namingService name=”Cos” host=”%COMPUTERNAME%” port=”%port%”/> NOTE: The port number must match what was used in step 3!
      2. image
    9. Save and close the file.
    10. Repeat steps 10-12 for %ORACLE_INSTANCE%\config\ReportsToolsComponent\ReportsTools\rwnetwork.conf and %DOMAIN_HOME%\config\fmwconfig\servers\WLS_REPORTS\applications\reports_11.1.2\configuration\rwnetwork.conf
    11. Start up WLS_REPORTS as well as any standalone reports servers you are using.

    After following the steps above, you should be able to run your reports successfully using a naming service.

    Source: http://docs.oracle.com/cd/E12839_01/bi.1111/b32121/pbr_conf008.htm#CHEHAECB

    Unable to edit OHS Configuration Files in Enterprise Manager for Forms 11.1.1.6 or 11gR2

    $
    0
    0

    For Forms versions 11.1.1.6.0, 11.1.2.0.0, and 11.1.2.1.0, if you installed the WebLogic and Forms environment using JDK 7 (NOTE: JDK 7 is not supported with Forms 11.1.2.0.0), if you attempt to make any modifications of any OHS configuration files in Enterprise Manager FMW Control, you will be presented the following error message:

    “Failed to invoke operation load on MBean oracle.as.management.mbeans.register:type=component,name=ohs1,instance=asinst_1,Location=AdminServer”

    image

    To fix this error, go to %ORACLE_INSTANCE%\config\OHS\ohs1 ($ORACLE_INSTANCE/config/OHS/ohs1 in Unix) and open up admin.conf with a text editor (please make a backup of this file before making any edits to this file or any configuration file). Once in the file, look for the parameter “SSLProtocol nzos_Version_3_0”. Change this to: SSLProtocol nzos_Version_1_0 nzos_Version_3_0

    image

    After making the change above, save and close the file. Restart OHS from either OPMN or Enterprise Manager. After OHS has been successfully restarted, you should be able to make edits to OHS configuration files in EM.

    NOTE: According to Oracle Support, this has been fixed with Oracle Forms 11.1.1.7.0.

    Source: Oracle Support note 1463846.1

    How to Modify Custom Jar Files with Permissions and Codebase Attributes

    $
    0
    0

    Due to the latest Java security patches beginning with JRE 1.7.0_25 and higher (especially JRE 1.7.0_45), all jar files have to be updated with the codebase and permissions attributes (and also the Application-Name attribute starting with JRE 1.7.0_45 although not mandatory at this time). For any jar files supplied by Oracle, please install Oracle Patch 16837591. NOTE: Do NOT update the Oracle jar files yourself! PITSS will not be held responsible if the Oracle jar files are tampered with. For steps on how to install the patch, please review our KB article at http://pitss.com/us/2013/09/26/how-to-fix-missing-permissions-manifest-and-missing-codebase-manifest-warnings-in-oracle-forms-using-jre-1-7-0_25-or-higher/.

    To update any custom-made jar files (or even jacob.jar) to include these parameters in the Java code, you may follow these steps:

    NOTE: In this example, MIDDLEWARE_HOME is C:\Oracle\Middleware (/oracle/middleware) and the ORACLE_HOME for Forms/Reports is C:\Oracle\Middleware\as_1 (/oracle/middleware/as_1)

    1. Navigate to %ORACLE_HOME%\forms\java ($ORACLE_HOME/forms/java).
    2. Create a new file called mymanifest.txt using a text editor.
    3. Add the following values into the text file:
      1. Permissions: all-permissions
      2. Codebase: *
      3. Application-Name: OracleForms
      4. image
    4. Save and close the file.
    5. In Command Prompt (Windows) or your SSH client (Unix), echo your PATH environment variable to make sure your JDK is in the PATH. Example: C:\Program Files\Java\jdk1.7.0_45\bin;… If it is not there, update the PATH variable as follows (using JDK 1.7.0_45 as an example):
      1. Windows: set PATH=C:\Program Files\Java\jdk1.7.0_45\bin;%PATH%
      2. Unix: export PATH=/oracle/jdk1.7.0_45/bin:$PATH
    6. Make sure you are in %ORACLE_HOME%\forms\java ($ORACLE_HOME/forms/java) and run the following command:
      1. jar –ufm name_of_jar.jar mymanifest.txt
      2. Example: jar –ufm jacob.jar mymanifest.txt
    7. Repeat step 6 for any other custom-made jar files.
    8. Resign any jar files you have updated in steps 6 and 7.
    9. Restart WLS_FORMS
    10. Close all browser windows and start a new browser window. Launch your Forms application.

    If successful, you should no longer see the “Missing permissions manifest…” and “Missing codebase manifest…” errors for your custom-made jar files.

    Source: Oracle Support note 1583119.1

    PITSS.CON Error –‘Batch Procedure ‘Load Forms’ is running!’

    $
    0
    0

    There are times where if PITSS.CON crashes when modules are being loaded, the following error will appear when you try to start loading modules again:

    image

    You can do the following to fix the problem:

    1. Go to Administration –> Batch Jobs
      • image
    2. In the Batch Jobs menu, you will see “Load Forms” on the left side of the window. As you can see, it is not a “green light”. Right-click on “Load Forms”.
      • image
    3. Click on “Reset Batch Procedure”
    4. The traffic light symbol next to “Load Forms” should be green again.
      • image
    5. Try loading a module again.

    Modules should load successfully now.

    Viewing all 152 articles
    Browse latest View live


    <script src="https://jsc.adskeeper.com/r/s/rssing.com.1596347.js" async> </script>